
- Check for asbestos first: Popcorn ceilings in homes built before 1980 may contain asbestos. If present, hire a licensed professional—do not attempt DIY removal.
- Proper preparation is key: Remove or protect furniture, cover floors, seal vents and doorways, turn off HVAC, and gather all tools and protective gear to minimize dust and mess.
- Wet scraping is the safest and cleanest method: Lightly mist the ceiling in sections before scraping with a wide putty knife or drywall scraper to reduce airborne dust and protect the drywall.
- Handle common challenges carefully: Be prepared for hard textures, uneven drywall, ceiling cracks, and potential water damage. Use joint compound, sanding, and patience to achieve smooth results.
- Post-removal finishing matters: Repair imperfections, prime the ceiling, and apply at least two coats of flat ceiling paint for a polished, modern look.
- Alternative options exist: If scraping feels overwhelming or unsafe, consider skim coating, decorative ceiling panels, or a drywall overlay to modernize the ceiling with less mess.
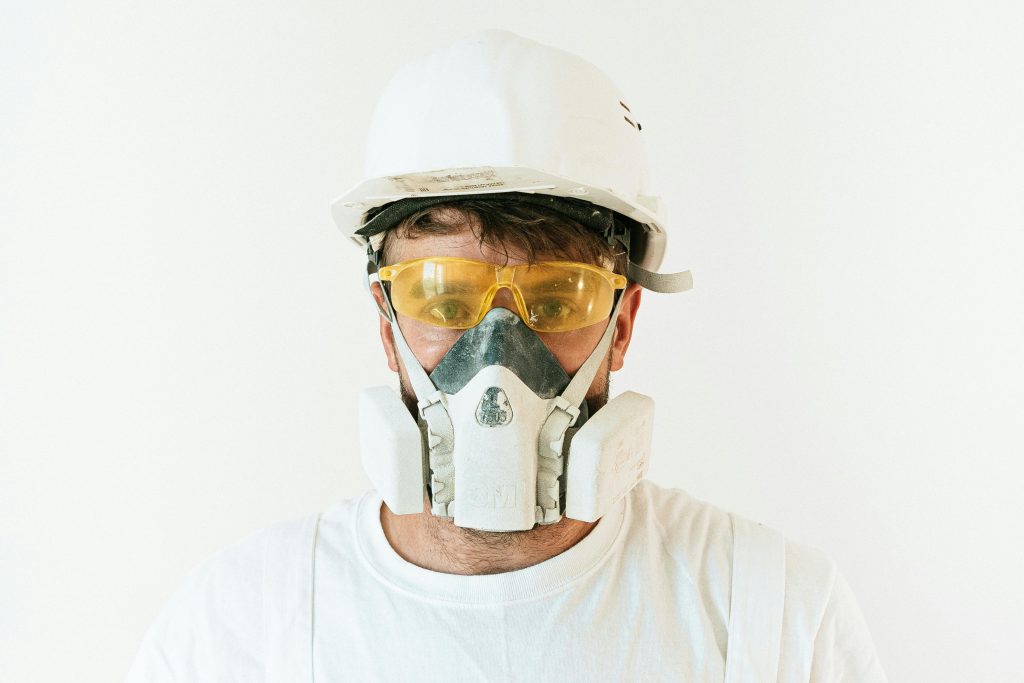
- Safety and comfort first: Wear a respirator or dust mask, goggles, gloves, and protective clothing. Take breaks, work in well-ventilated areas, and avoid rushing.
Popcorn ceilings may have been all the rage decades ago, but today they’re often seen as outdated and difficult to maintain. If you’re tired of looking up at a textured ceiling that collects dust and looks old-fashioned, removing it yourself might be the perfect DIY project. But before you start scraping away, it’s important to know how to remove popcorn ceiling safely and with minimal mess.
This guide will walk you through every step of the process, from assessing your ceiling to finishing touches, so you can achieve a smooth, modern look without turning your home into a dust storm.
Is Your Popcorn Ceiling Safe to Remove?
Before you touch a single tool, you need to know if your ceiling contains asbestos. Asbestos was commonly used in popcorn ceilings until the late 1970s. Disturbing asbestos fibers can be hazardous to your health.
How to Check for Asbestos
- Check the age of your home. Homes built before 1980 are more likely to have asbestos-containing ceilings.
- Purchase an asbestos test kit from a hardware store or online.
- Consider hiring a certified asbestos inspector for peace of mind.
Tip: If your ceiling does contain asbestos, do not attempt to remove it yourself. Call a licensed professional. Safety should always come first.
What Tools and Materials Do You Need for a Mess-Free Removal?
Preparation is key to a successful popcorn ceiling removal. Here’s what you’ll need:
Tools:
- Putty knife or wide drywall scraper
- Garden sprayer or spray bottle
- Ladder or step stool
- Sanding block or pole sander
Protective Gear:
- Safety goggles
- Dust mask or respirator
- Disposable coveralls or old clothing
- Gloves
Preparation Materials:
- Plastic sheeting or drop cloths
- Painter’s tape
- Trash bags
- Bucket of warm water
Having everything ready before you start can save hours of cleanup and prevent frustration mid-project.
How to Prepare Your Room for Ceiling Removal
Proper preparation is critical for keeping your home clean and minimizing stress during popcorn ceiling removal. This is one of the most important steps because the process can be messy, dusty, and time-consuming. Taking the time to prepare your space upfront will save you hours of cleanup later.
Steps to Protect Your Space
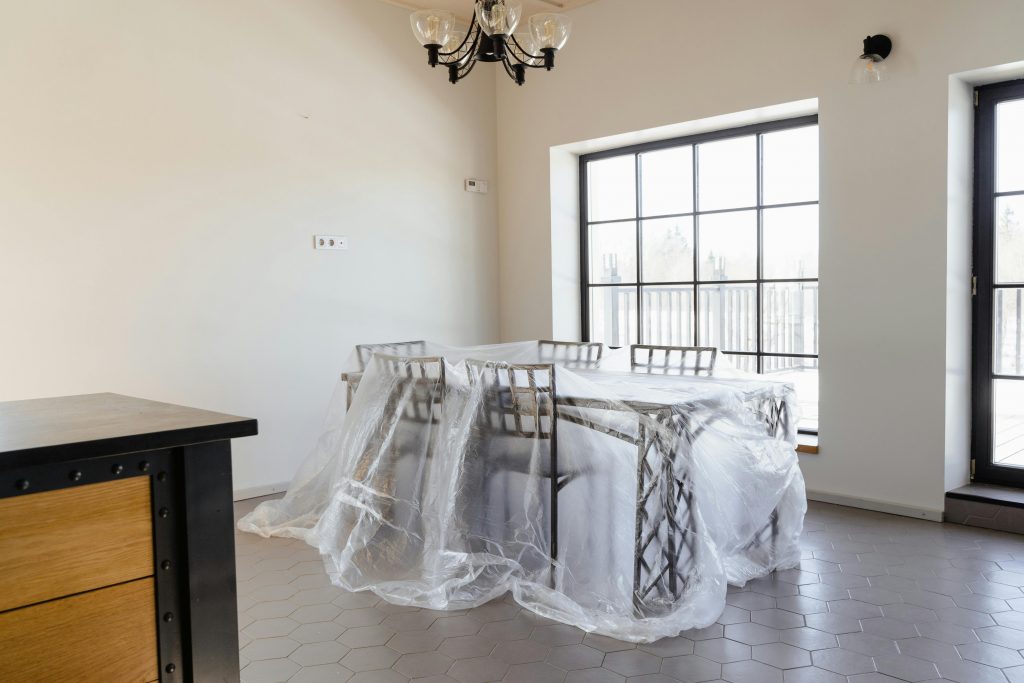
- Remove or Protect Furniture
- Ideally, remove all furniture from the room. If that’s not possible, move it to the center of the room.
- Cover furniture completely with heavy-duty plastic sheeting, securing the edges with painter’s tape to prevent dust from sneaking underneath.
- For small items or fragile objects, place them in sealed boxes or another room entirely.
- Cover the Floors
- Popcorn ceiling debris can scatter and stick to carpets, so cover the entire floor with thick, heavy-duty drop cloths or plastic sheeting.
- Overlap sheets at seams and tape them down to avoid slipping or gaps where debris can fall.
- If you have carpet, consider laying an additional layer of paper or cardboard for extra protection.
- Seal Off Vents and Doorways
- Dust from popcorn ceiling removal can travel to other rooms through vents or gaps under doors.
- Use painter’s tape and plastic sheeting to seal HVAC vents and doorways.
- For doors, tape the plastic around the frame, leaving a flap you can lift to enter and exit without letting dust escape.
- Turn Off HVAC Systems
- Running your heating or air conditioning can circulate dust throughout your house.
- Turn off your HVAC system and close any vents temporarily.
- This keeps debris contained and makes cleanup much easier.
- Gather All Tools and Supplies Ahead of Time
- Have your scraper, spray bottle, bucket, ladder, and protective gear ready.
- Lay out trash bags and a broom or vacuum for quick debris removal as you work.
Tip: Preparation might feel tedious, but investing an extra hour or two upfront drastically reduces cleanup time and helps the removal go smoothly.
How to Remove Popcorn Ceiling Without Making a Huge Mess
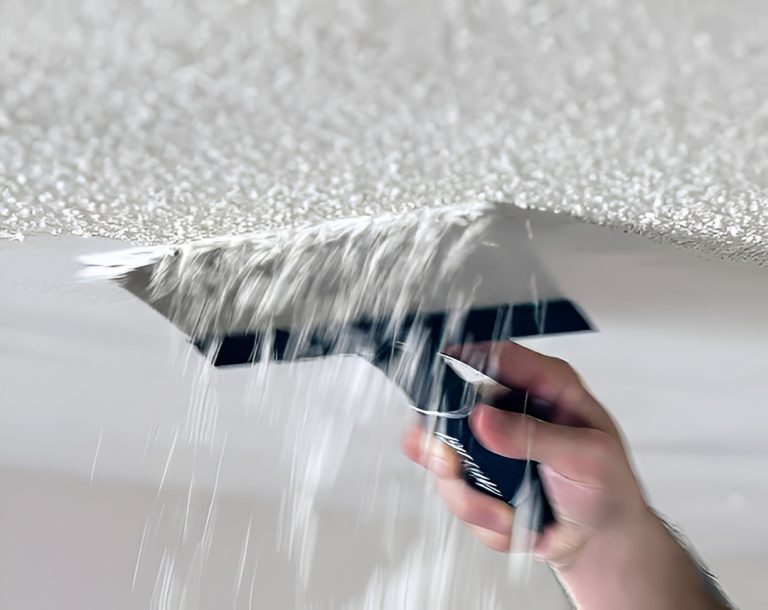
One of the biggest concerns for DIYers is dust. Popcorn ceiling removal can quickly turn into a cloud of particles if not done carefully. The best way to prevent this is wet scraping. By softening the texture with water first, you make scraping easier and keep dust to a minimum.
Step-by-Step Wet Scraping Method
- Test a Small Area
- Start with a 2×2 foot section of your ceiling.
- Lightly mist the area with water using a garden sprayer or spray bottle. Avoid soaking it completely.
- Wait 10–15 minutes and test with your scraper. If the texture softens and lifts easily, you’re ready to proceed.
- Work in Small Sections
- Spray the ceiling in 4–5 foot sections at a time.
- Let the water penetrate but don’t over-saturate, as too much water can damage drywall or create a muddy mess.
- By working in sections, you maintain control and keep the debris manageable.
- Scrape Carefully
- Use a wide putty knife or drywall scraper. Hold it at a slight angle (about 30 degrees) to avoid gouging the drywall beneath.
- Gently push the popcorn texture off the ceiling, letting gravity do the work.
- Scrape slowly to keep large chunks from scattering.
- Collect Debris Immediately
- Keep a trash bag or bucket nearby to catch falling material.
- If needed, use a small broom or dustpan to collect larger pieces as you go.
- Repeat Until Complete
- Continue spraying, softening, and scraping in small sections until the entire ceiling is smooth.
Tips for Minimal Dust
- Mist lightly instead of drenching, which prevents water from seeping into drywall.
- Work slowly and deliberately to avoid sending debris flying.
- Keep your mask on at all times, even when the ceiling appears wet.
- Consider wearing goggles to protect your eyes from splashes or airborne particles.
What Are the Common Challenges and How to Overcome Them?
Even with careful preparation, some issues can arise during popcorn ceiling removal. Knowing how to handle them ahead of time will save you frustration.
- Hard or Stubborn Texture
- Some popcorn ceilings are older or contain glue that makes scraping more difficult.
- Solution: Re-mist the area and wait a few more minutes to allow the texture to soften.
- Use a sharper or more rigid scraper, but apply gentle pressure to avoid damaging drywall.
- Avoid forcing the scraper; patience is key.
- Uneven or Damaged Drywall
- Scraping may reveal dents, holes, or uneven surfaces beneath the texture.
- Solution:
- Apply a thin layer of joint compound to fill dents or holes.
- Let it dry completely, then sand smooth with a sanding block or pole sander.
- Repeat if necessary to achieve a uniform surface ready for priming and painting.
- Ceiling Cracks
- Small cracks in your drywall can widen during scraping.
- Solution:
- Apply drywall tape over the cracks.
- Cover with joint compound and smooth it evenly.
- Once dry, sand carefully to blend the repair with the rest of the ceiling.
- Water Damage Risk
- Over-saturating the ceiling can cause water damage or mold growth.
- Solution: Mist lightly and avoid letting water sit on the surface for long periods.
- Work section by section to ensure water evaporates quickly and the ceiling stays intact.
Tip: Keep a damp sponge or towel on hand to wipe up excess moisture immediately.
How Can You Make the Process Safer?
Safety is critical when removing popcorn ceilings. Here’s how to protect yourself:
- Wear a respirator or dust mask at all times.
- Use safety goggles to protect your eyes from falling debris.
- Cover your hair and skin with a disposable hat and clothing.
- Work in well-ventilated rooms to reduce dust inhalation.
- Take breaks to avoid fatigue on ladders or step stools.
Should You Wet or Dry Scrape Your Ceiling?
You might see advice for dry scraping online, but for most DIYers, wet scraping is safer and cleaner. Here’s why:
Wet scraping benefits:
- Reduces airborne dust
- Makes popcorn texture easier to remove
- Minimizes damage to drywall
Dry scraping can be faster in some cases, but it creates clouds of dust and increases cleanup time, making it less ideal for most homeowners.
How to Handle Asbestos-Containing Popcorn Ceilings
If your ceiling tests positive for asbestos, do not attempt DIY removal. Asbestos fibers are extremely dangerous when inhaled. Your options are:
- Hire a licensed asbestos abatement professional.
- Consider encapsulation (covering the ceiling with new drywall or ceiling tiles).
- Avoid sanding or disturbing the material in any way.
Even a small misstep can have serious health consequences, so professional help is strongly recommended.
What Are the Steps After Removing Popcorn Ceiling?
Removing the popcorn texture is just the first part of the project. Once the ceiling is bare, it’s rarely perfectly smooth. Skipping the finishing steps can leave bumps, cracks, or uneven paint coverage. Proper post-removal preparation ensures your ceiling looks clean, modern, and professional.
Step 1: Repair and Smooth
Even a careful removal can leave behind minor damage or imperfections in the drywall. Here’s how to handle them:
- Inspect the Ceiling Thoroughly
- Check for dents, small holes, scratches, or areas where the drywall might be exposed.
- Light up the ceiling with a bright work light or flashlight to spot subtle imperfections.
- Fill Imperfections with Joint Compound
- Use a putty knife to apply a thin layer of joint compound to cracks, dents, or gouges.
- For larger holes or cracks, apply drywall tape over the area first, then cover with compound.
- Feather the edges of the compound to blend with the surrounding ceiling for a smooth finish.
- Sand the Surface
- After the compound dries (typically 12–24 hours), lightly sand the ceiling with a sanding block or pole sander.
- Use medium-grit sandpaper first, then finish with fine-grit for a smooth surface.
- Wipe away dust with a damp cloth or sponge before moving on to primer.
Tip: Take your time with sanding. Uneven surfaces will show under fresh paint, so patience pays off.
Step 2: Prime the Ceiling
Priming is a critical step that often gets overlooked, but it makes a huge difference in the final appearance:
- Choose the Right Primer
- Select a drywall or ceiling primer designed for smooth surfaces.
- Primer helps seal the patched areas and creates a uniform surface for paint.
- Apply Evenly
- Use a roller with an extension pole for broad coverage and a smooth finish.
- Work in sections, overlapping slightly to prevent streaks or roller marks.
- For corners and edges, use a brush for precision.
- Let the Primer Dry Completely
- Follow the manufacturer’s recommended drying time, usually 2–4 hours.
- Check for uneven spots and touch them up as needed.
Tip: A coat of primer also reduces the risk of stains showing through and helps paint adhere better, giving your ceiling a professional look.
Step 3: Paint
Painting is the final step that transforms your ceiling from raw drywall to a polished, modern surface.
- Select the Right Paint
- Use a flat or matte ceiling paint to minimize reflections and hide minor imperfections.
- High-quality paint often requires fewer coats and looks smoother.
- Apply the First Coat
- Start with a roller on an extension pole to reach the middle of the ceiling comfortably.
- Work in small, overlapping sections to avoid streaks.
- Use a brush for edges, corners, and any areas the roller can’t reach.
- Let the Paint Dry
- Drying times vary based on humidity and paint type, but usually 2–4 hours is sufficient.
- Apply a Second Coat
- Most ceilings benefit from a second coat to ensure uniform color and finish.
- Again, roll in sections and maintain consistent coverage.
Tip: Avoid overloading the roller with paint; this reduces drips and ensures a smooth finish.
Step 4: Clean Up
Even after careful scraping, dust and debris may still be present. Cleaning properly prevents it from spreading to other rooms:
- Remove Drop Cloths Carefully
- Fold them inward to trap debris rather than shaking it off.
- Dispose of debris responsibly according to local regulations.
- Vacuum and Wipe Surfaces
- Use a vacuum with a HEPA filter to remove fine dust.
- Wipe walls, window sills, and baseboards with a damp cloth to remove lingering particles.
- Check for Final Touch-Ups
- Inspect the ceiling once the paint dries.
- Spot-paint any areas that need extra attention or touch-up.
Tip: Keeping the cleanup organized makes the room feel complete and ensures your new ceiling looks pristine.
Can You Do It Alone or Should You Hire Help?
Many homeowners can tackle popcorn ceiling removal themselves, but the job can be physically demanding. Consider:
- Room size: Larger rooms require more effort and time.
- Ceiling height: High ceilings may need scaffolding or ladders.
- Skill level: First-time DIYers may benefit from a friend’s help.
- Health concerns: Respiratory issues or mobility challenges may make professional help safer.
What Are Some Alternative Options to Removing Popcorn Ceiling?
Scraping a popcorn ceiling can be messy, time-consuming, and physically demanding. If the thought of wet scraping has you stressed—or if your ceiling contains asbestos—there are several alternative ways to modernize your ceiling without going through the full removal process. These methods can give your home a fresh, contemporary look while minimizing dust, effort, and potential risks.
Skim Coating
Skim coating is one of the most popular alternatives to scraping. It involves applying a thin layer of joint compound over the existing popcorn texture to create a smooth, flat surface.
How to Skim Coat a Ceiling:
- Prepare the ceiling by lightly cleaning it and removing any loose popcorn bits.
- Mix the joint compound to a smooth, spreadable consistency.
- Apply the compound using a wide drywall knife or trowel in thin, even layers.
- Feather the edges to blend the new layer seamlessly with the ceiling.
- Let it dry completely, then sand lightly to remove any imperfections.
- Prime and paint the ceiling for a finished, modern look.
Benefits:
- Minimal dust compared to scraping
- Smooth, professional-looking finish
- Can be done DIY with basic tools
Drawbacks:
- Requires patience and some skill to achieve a uniform surface
- May need multiple layers depending on the thickness of the popcorn texture
Ceiling Panels or Tiles
Another alternative is to cover the popcorn ceiling entirely with decorative panels or tiles. This is ideal if you want to add style while hiding imperfections.
How to Install Ceiling Panels:
- Measure your ceiling to determine the number of panels or tiles needed.
- Choose a panel type—options include foam, PVC, metal, or wood-look tiles.
- Attach panels directly to the ceiling using adhesive or screws, following manufacturer instructions.
- Seal seams with trim or molding for a polished finish.
Benefits:
- Transforms the ceiling instantly with minimal mess
- Adds design and texture for a modern or classic look
- Can hide damaged drywall or stains
Drawbacks:
- Can be more expensive than DIY scraping
- Requires precise measurements and careful installation
- May reduce ceiling height slightly
Drywall Overlay
If you want a completely fresh ceiling without scraping, a drywall overlay is another solution. This involves attaching new drywall sheets over the existing popcorn ceiling.
How to Install a Drywall Overlay:
- Measure and cut drywall sheets to fit the ceiling.
- Secure sheets to ceiling joists using screws, making sure seams are tight.
- Tape and mud seams with joint compound, then sand smooth.
- Prime and paint for a completely new, flat ceiling finish.
Benefits:
- Provides a clean, modern ceiling surface
- Covers popcorn, cracks, stains, or uneven texture entirely
- Long-lasting and durable
Drawbacks:
- Heavier and more labor-intensive than skim coating or panels
- Likely requires professional help for larger ceilings
- Slightly reduces ceiling height
Choosing the Best Option
When deciding which method to use, consider:
- Your budget: Skim coating is often the cheapest DIY option, while overlays and panels can cost more.
- Ceiling condition: If the popcorn is in poor shape or contains asbestos, covering it may be safer than scraping.
- Skill level: Skim coating and panels are doable for most DIYers, while a drywall overlay may require professional installation.
- Desired look: Decorative panels can add style, while skim coating or overlays give a sleek, modern finish.
Tip: Even if you go with an alternative method, you’ll still need to clean and prep the ceiling surface first. Proper prep ensures your chosen solution adheres well and lasts for years.
How Long Does It Take to Remove a Popcorn Ceiling?
The time required depends on room size, ceiling height, and whether it contains asbestos. On average:
- Small room (10×10 ft): 2–4 hours
- Medium room (12×15 ft): 4–6 hours
- Large room (20×20 ft): 6–10 hours
Prep, cleanup, and painting may add a few extra hours. Planning ahead is key to a stress-free process.
What Are Some Pro Tips for a Smoother Ceiling?
- Work in sections and stay patient; rushing leads to mistakes.
- Keep the ceiling slightly damp, not soaking wet.
- Use a wide, flexible scraper to avoid gouging drywall.
- Keep a bucket of water nearby to rinse the scraper often.
- Always wear protective gear, even for small jobs.
How Much Does DIY Popcorn Ceiling Removal Cost?
Doing it yourself is much more affordable than hiring a contractor. Typical costs:
- Tools and materials: $50–$150 (scraper, sprayer, drop cloths, joint compound)
- Protective gear: $20–$50
- Professional removal: $1–$3 per square foot, not including repair or painting
DIY projects save money but require time, effort, and attention to safety.
In Closing
Removing a popcorn ceiling might seem intimidating, but with the right preparation, tools, and safety measures, it’s a totally doable DIY project. By following this step-by-step guide, you can remove your ceiling safely, minimize the mess, and enjoy a smooth, modern finish that instantly updates your home.
Take your time, protect yourself, and plan for cleanup. In the end, your new ceiling will be worth every bit of effort.